It is possible to order Train-Science Open Source printed circuit boards (PCB) directly at the source. This is the PCB manufactoring plant of JLCPCB in China. You can ofcourse use other PCB manufactorers as well. JLCPCB is by far the cheapest possible way to get all kind of decent DCC decoders.
This page contains an eloborate step by step tutorial about how to do this.
- Ordering
- Step 1: Download the necessary files.
- Step 2: Open Google Chrome and surf to JLCPCB.com
- step 3: upload the gerber files and adjust a setting or two
- Step 4: Select your BOM and CPL
- Step 5: Pick your components.
- Step 6: Verify component positions
- Step 7: Put the PCB in your basket and make the purchase
- Step 8, flashing firmare
Ordering
Ordering a bare PCB @ JLCPCB is incredible simple thing to do. Nevertheless, caution is advised. It is possible to screw something up. To make use of the SMT assembly service does take some efforts. I therefor made a guide how to make use of their SMT assemble services.
disclaimer: Be aware that ordering my design is at your own risc. If you screw something up and get defective boards don’t look at me.
Step 1: Download the necessary files.
In order to download the files you need. You need to download the entire Train-Science-DIY repository. https://github.com/bask185/Train-Science-DIY/tree/master click on the green code button and click download ZIP.
Once the zip file is downloaded, extract it.
Step 2: Open Google Chrome and surf to JLCPCB.com
The website is sometimes updated and I found that this may come with bugs from time to time. It is therefor imperiative to use the Google Chrome browser for the following steps. So no edge, safari or firefox. Surf to JLCPCB.com and create an acount. You can also login with your Google acount. You will need an acount for ordering PCBs. Having an acount also makes it easier to repeat previously made orders.
step 3: upload the gerber files and adjust a setting or two
Gerber files are files which contain the physical properties and infomation about the PCB design itself. They are needed to order PCBs. They are stored in a zip file. This zip file you need to upload
Uploading the gerber files can be done by clicking on the ‘add gerber files’. A window will pop-up. Navigate to your newly downloaded folder and click on the zip files which is named GERBERS.zip.

This will lead you to the next screen on JLCPCB.com. There are alot of settings there but you only need to touch a few of them.
You need to select the amount of boards you want to order. JLCPCB has a cheap and more expensive service. With the cheap service you can order up to 50 assembled PCBs. Ordering 50 boards will give you a fairly low price per unit.
The absolute minimum number is 5. If you order 5 you have a special option to do SMT assembly on only 2 of them. Bear in mind that this will increase the price per unit. More boards -> less $ or € per board
The most important setting of all. Select your color!! You are free to order any color of choise. However anything else but green and black will be more expensive for SMT assembly. Black also takes slightly longer to be produced. So that may cost a day or three more. With black you may order 30 units max (for economic service) if you pick green you can order up to 50. Otherwise you may use the more expensive service.
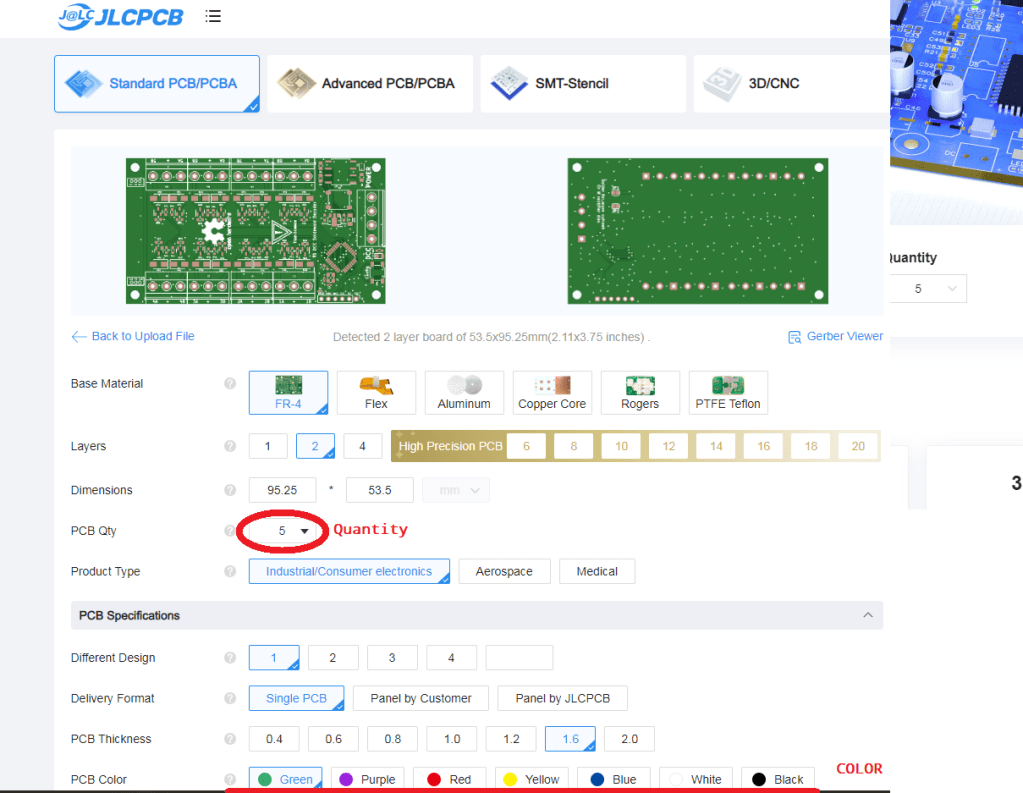
The last setting you need to do is to select SMT assembly. It is somewhere at the bottom of the screen. Also make sure that you select top side behind the ‘assembly side’ setting if it isn’t selected already.
I also recommend to check ‘Yes’ behind Confirm Parts Placement. This will let their personal double check your work. And it only costs a few cents.
Lastly, by default JLCPCB places an order number in silk on your board. You can set a setting behind ‘Removed Order Number’ to prevent JLCPCB from doing so. This costs a few cents as well.
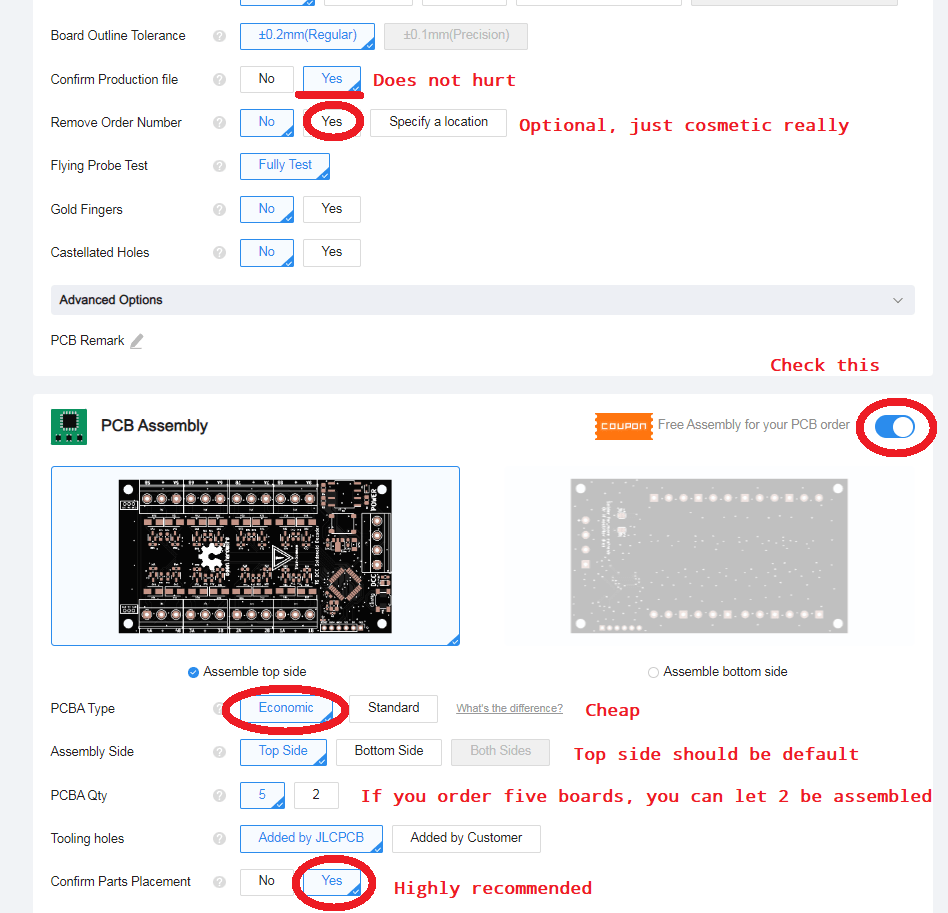
If you press Next you get to the next screen. This one only wants to know if you want to do the top or bottom side. It should already say top side, so can just press next.
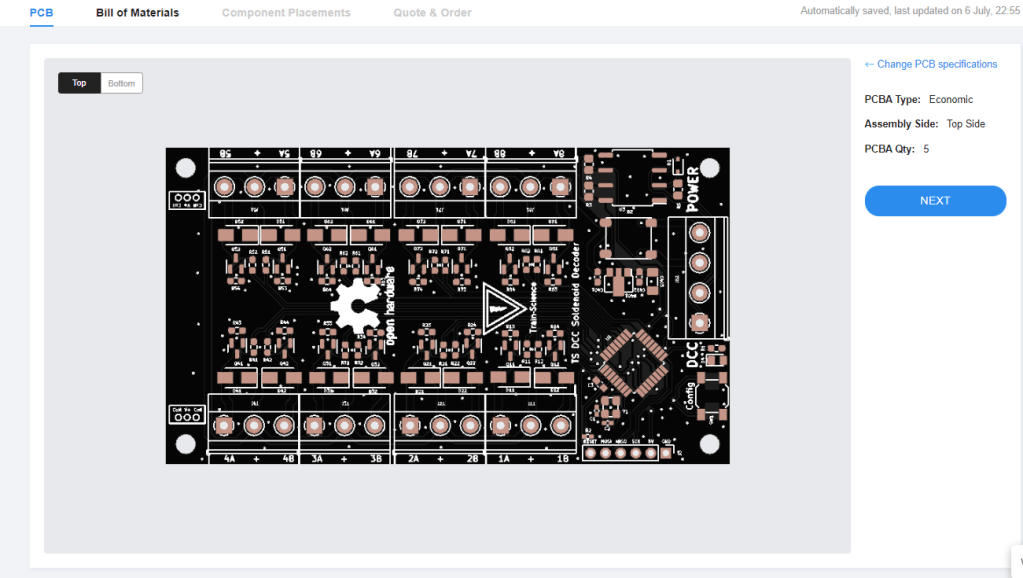
Step 4: Select your BOM and CPL
Here you need to upload two more files. That is the Bill Of Material (BOM) and the Component Placing List (CPL), Click on the zones where you see upload and select the appriopate files from your downloaded folder. They are named BOM and CPL and are hard to miss. Press Next when you are finished.
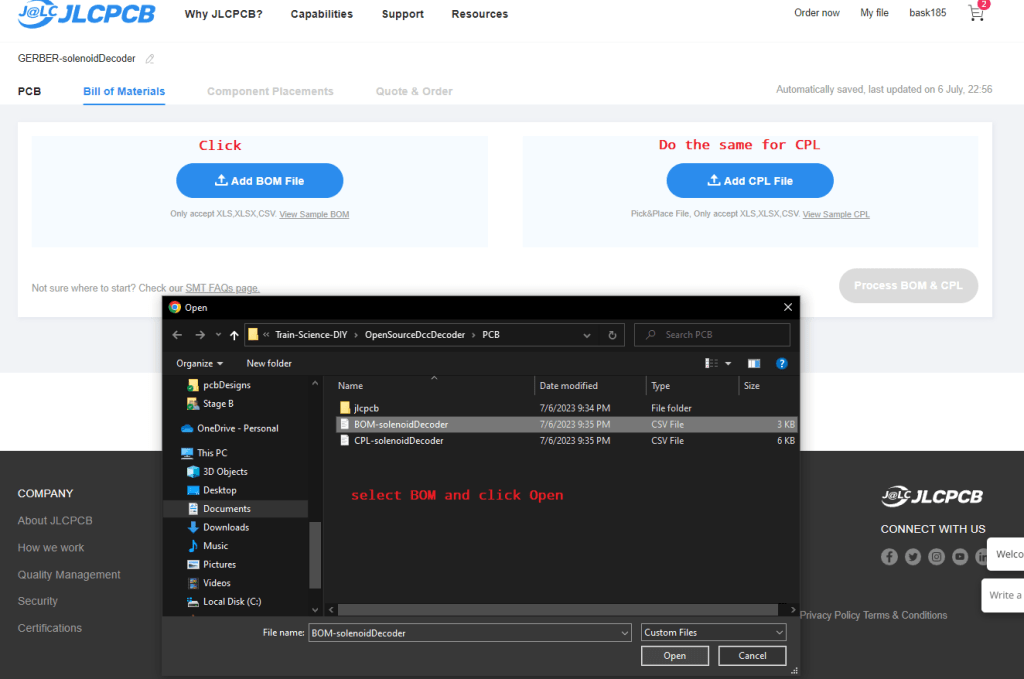
Press ‘Process BOM & CPL when you are ready.
Step 5: Pick your components.
If I did my job properly you won’t have to do anything at all, besides pressing Next. In this page you can select parts and search for them. This information is already in the BOM you just uploaded. So you can just hit Next and go to step 6.
I do will explain a few things. JLCPCB has ‘basic’ parts and ‘extended’ parts. Basic parts are already in their assembly lines. Extended parts need a roll with components to be swapped by hand. A fee of 3$ is charged for this. I always try to avoid extended parts but it cannot always be ommited. There are also ‘preferred extended’ this means that they still have to swap a component roll but without the fee. So essentially it counts as a basic.
I also try to avoid through hole parts for as much is possible. Things like terminal blocks and such are included in the BOM and CPL but if you want to be extra cheap, you can deselect these parts. The people at JLCPCB need to handsolder these components and for this a fee is charged as well. It is in my opinion a small price to pay for the labour.
In the bottom of the list the components are placed which don’t have components. In this example that is every screw terminal.
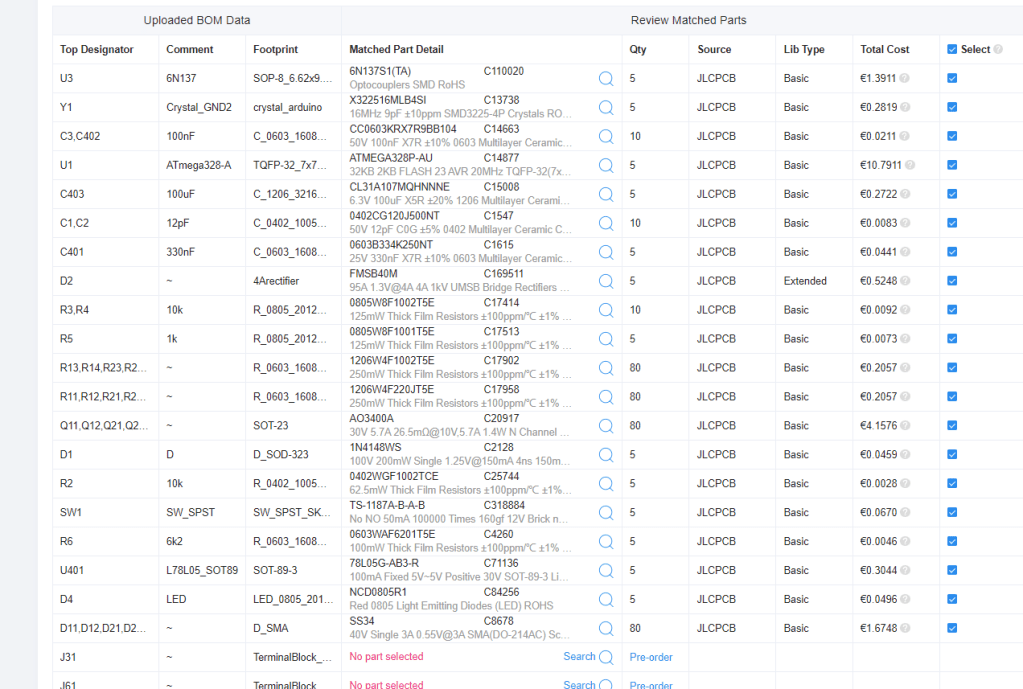
In absolute worst case scenario it may occur that a component is out of stock. I did check stock amounts when I picked the components. So with a little luck it shouldn’t ever happen. You can however pre-order parts whenever needed. But you need to do this before you can place an SMT order. To pre-order parts, surf to JLCPCB.com/parts, find the lacking component. Easiest way is to enter the LCSC number in the search bar, fill in the number that you will need and click the pre-order button.
Alternatively you can purchase the missing component from somewhere on thw www and solder it by hand. I pick relative large components which should not be too hard to solder.
Step 6: Verify component positions
In this step we need to visually examine our board design and our component placing. Take extra care as this step is very crucial.
This is what you should see. In this step it is often needed that you need to manually rotate components using the site’s editor. Everything with more than 2 connections must be visually examined. Especially symmetrical IC’s. You can use the pictures that are present in the github folder for visual confirmation.
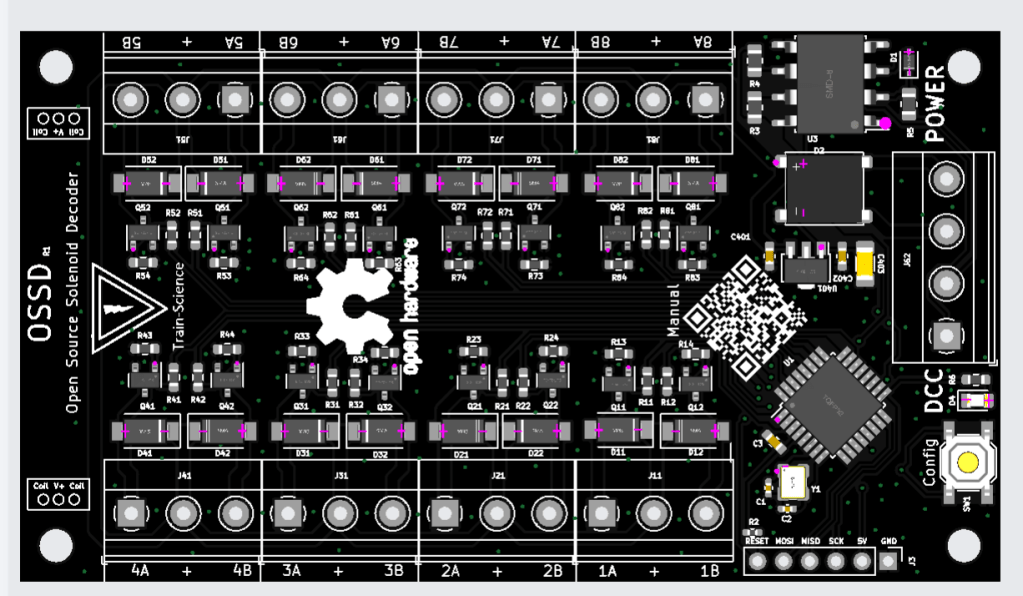
When you are sure about the component places and rotations, click on Next.
Step 7: Put the PCB in your basket and make the purchase
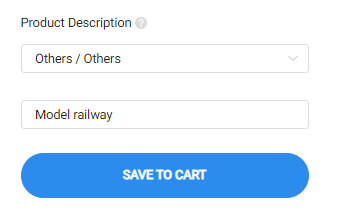
For some dark reason you need to enter a product description on the right side. I usualy select ‘other’ and ‘other’ again and then I type something like ‘model railway’ but it does not really matter.
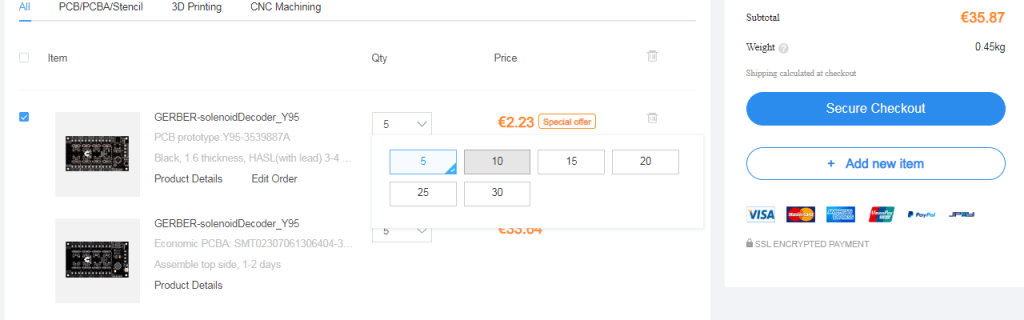
If all above steps are completed without any errors. You are ready to place the order. Do so now. Click on save to cart and don’t back down. You are almost there!

The final thing you can do, is to alter the amount of PCBs you want to order. Yes you already did this before and now can change your mind and buy even more PCBs. If you are ok with the quantity, click on ‘secure checkout.
On the next screen you just need to fill in your adres. With an acount JLCPCB will remember this for the next time. So fill everything in and hit continue.
You will see that the shipping is sorta expensive. However you are able to select much cheaper shipping services.
The global standard direct line is often cheapest (and slowest). It often takes 1.5 week for livery. This service is only available when the order (shipping including) is under the $150. Otherwise you can make use of FedEx, because this is simply the cheapest. Do take note that you will receive an extra bill of FedEx after delivery. You will have to pay taxes.

As you can see, for 5 PCBs of a OSSD you have to pay around €56,-. So every board is around €11. If you purchase 50 boards, you will pay around €7.50 per board*. A commercial equivalent is easily €60+.
If you made a new acount you may also make use of a coupon for your first order. You will be granted with coupons quite regurely.
So just complete the purchase and … well just wait for it.
If you are happy with your decoder and you want to order more for personal or commercial purposes, you can easily re-order the boards using the order history @JLCPCB. You don’t have to repeat the above steps for this.
So feel free to manufactor them and sell em on. My designs are not licensed with the exception of the Open Source Hardware license.
Step 8, flashing firmare
Most of my designs need software to work. JLCPCB does not offer a service for flashing the decoders so this we to do ourselfes. Click on this link for the firmware uploading tutorial..
